Instructions for maintaining web pages on SnowCrest for
Windows
When you sign up for a www home
page you will be given our standard user home page. This
page is located in the SnowCrest's home page under "Snowcrest
users' home pages" and then under "your name." You can view
your page by using Microsoft Internet Explorer or Netscape
Navigator. This page contains sample links to sound, pictures,
mpeg movie clips, and other home pages.
You should take a look at the sample
home page links as they will answer many of your questions
about the web, HTML(the language that home pages are written
in), and home pages. One of the links will also allow you
to get HTML editors for programming your home page.
Step 1 -- Make a directory on your
computer to store Home Page files
In Windows 95, use Windows Explorer.
You can get to this program by opening the "Start" menu,
choosing "Programs", and choosing "Windows Explorer". Try
creating the directory C:\homepage.
Step 2 -- Connect to Internet
Just connect like you normally do when
you log in to Snowcrest. Once you are logged in, you should
minimize the windows you opened to connect.
Step 3 -- FTP to www.snowcrest.net
|
Double click on the CuteFTP icon
to open File Transfer Protocol. "Site Manager" should
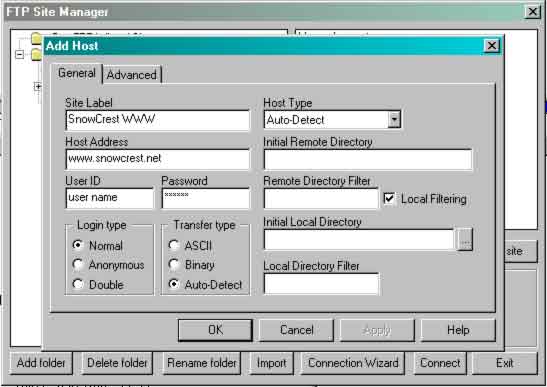
automatically open. Click on the "Add Site" button.
In the window that appears, type "SnowCrest WWW" in
the "Site Label" field. Then type "www.snowcrest.net"
in the "Host Address" field. Type your account name
into the "User ID" field. Type your password in the
"Password" field. Make sure you select "normal" under
Login Type and select "Auto-Detect" under Transfer
Type. Then click "OK".
Your Site manager is now configured
to login to your website whenever you select "Snowcrest
WWW" and click the "connect" button. Do this now to
connect.
When you connect, a "Login Messages"
windows will appear. Click "OK".
Now you are totally connected
to your web site via FTP.
|
View
Screen Shot
|
Step 4 -- Download your index.html
document
|
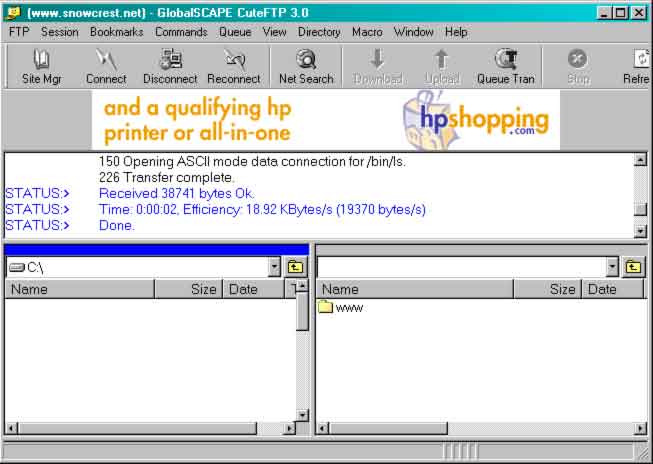
The window you are now in should
have three smaller windows inside it. The top window
is the status of your connection. The left window
represents your computer. It displays directories
and files on your computer similar to the way file
manager or windows explorer display them. The right
window represents the Web Server. It should start
in the directory labeled with your account name. For
example, if your account name was jed, you should
start in the /jed directory.
In the right window there should
be a "WWW" folder. Double click that to open it. The
right window should then show you the contents of
this folder. Included should be a file named "index.html".
This is the main HTML document on your website, also
known as your "Home Page".
To download this document you
should first direct the left window to the directory
you created in Step 1. To do this, you can click the
arrow in the top left corner of the left window to
move up one directory, or by clicking on the directory
you wish to go to. Then, all you need to do is drag
the "index.html" document from the right screen to
the left. This is how you download any file using
CuteFTP.
|
View
Screen Shot
|
Step 5 -- Exit FTP and enter editor
To exit your FTP session, go to the
FTP menu and choose "Disconnect" Then close CuteFTP. At
this point you have your choice in which editor you use.
Some popular editors include Netscape Communicator and Microsoft
Frontpage. You can find several different HTML editors in
the sample page under HTML
editors. You can also write HTML with a text editor
such as Notepad(comes with Win 95).
Step 6 -- Editing HTML text
First off we tried to include a few
things in the sample page that people might want to use
in their own page. This allows you to see how the lines
are created and then imitate them with your own information.
- Example one -- text for people
to read
<DL>
- <DT> Write what you
want to say here, it will appear in black.
- Example two -- Link for someone
to click on
<A HREF="http://www.snowcrest.net">SnowCrest's
home page.</A>
- the (http://www.snowcrest.net)
is the URL or address of the link
- the (SnowCrest's home page)
is the part people will see and be able to click.
- Example three -- Links your
ftp site for others to download files
<A HREF="ftp://ftp.snowcrest.net/pub/users/(your
account name)">files</ A>
- Example four -- Show them a
movie(mpg)
<A HREF="http://www.snowcrest.net/(account
name)/(mpg file)">movie</A&g t;
- Example five -- Sound and pictures
( .snd, .wav, .voc, .gif, .jpg)
exactly the same as movie except
put the sound or picture file in place of the mpg file.
- Example six -- innumerable other
possibilities
You can either find a faq on the
net to give you more ideas or if you come across someone
else's www page that has something interesting you can
go the the "view" menu and then click on "source". This
will allow you to see the HTML of that page. Write down
the manner in which it was done and use it for your
page.
Step 7 -- Uploading your HTML document
Close out your editor and reconnect
to the Internet. Now enter FTP once again. Connect to
SnowcrestWWW again. Click on the "www" folder in the
right window. Again change to your homepage directory
in the left window. Drag your newly edited homepage
document from the left window to the right window. This
is how to upload any file from your computer to your
website. Your home page now looks like the new edited
index.html document!!!
Step 8 -- Uploading the sound,
picture, movie files
This is just like uploading the
index.html document. You put the files in by using CuteFTP.
Connect to www.snowcrest.net. Click on "www". Any files
you wish to upload to your site can be uploaded by dragging
them from the right window to the left window.
ADDITION 1 - Facts and Tips
- Our system in case sensitive!
Always remember that if you name a file in all caps
or with the first letter a capital then you must call
for that file as EXACTLY that. For example, if you
call a graphic file "BigLogo.gif", then try to put
that graphic on your page with a line like this: <IMG
SRC="biglogo.gif"> then your picture won't show
up.
Also, when naming your files
don't use ANY SPACES or special characters (besides
periods, dashes "-", and underscores "_"). Spaces
and other special characters are interpreted as
the end of a name or are special commands reserved
for UNIX.
- You have 100 MB of space
in your www folder. The server will not let you upload
any more than you have space. If you need additional
space you can get an additional 100 MB. Call SnowCrest
or email to support@snowcrest.net
for current information on pricing.
- You can always view your
web pages on your own computer, even if you aren't
connected to the Internet. If you keep copies of all
your webpage files on your own computer you can view
them through your web browser simply by going to File
and choosing Open File or Open Local File, depending
on your web browser. Then go into your Web Page folder
and open your index.html document or any other file.
- If you have problems seeing
changes you just made to any of your pages here are
some things to try:
- Push the Reload or Refresh
button
- Try saving or uploading your
document again
- Clear you browsers' cache
file (or even set it to zero)
- Close your web browser and
open it again
Web browsers save copies of
pages that you visit in their cache. That way when
you push the Back button it loads the page in a
couple seconds rather than redownloading it from
the Internet. Sometimes this can work against you
when designing web pages when you make a change
and you can't get it to register when you view the
page. Try the above tips before pulling your hair
out.
- Not all web browsers are the same.
The most popular web browsers are the Internet Explorer
and Netscape Navigator. People will be viewing your
page with both of these so you will want to test you
page with both browsers to make sure things look OK.
Also, remember that people have different versions
of these browsers and that could even change the way
your page looks to them. One major difference is that
Internet Explorer 2.0 can't view frames or java. If
you get into adding either of these features to your
page you might want to consider having a secondary
page for those whose web browsers don't support these
features.
ADDITION 2 - About adding forms
to your home page:
Forms
ADDITION 3 - Using CGI scripts
Click
Here for information about adding forms to your website.
If you're up for a challenge,
you can try adding one of the CGI scripts which SnowCrest
has made available to you to your page. CGI scripts
allow your page to do much more than simple HTML commands
allow. They do require a little more effort to get them
to work, though. Instructions for the CGI scripts SnowCrest
has available can be accessed at
http://www.snowcrest.net/cgi/index.html.
Back to SnowCrest
|


