|
|
Spokeshaves are a miracle tool once you get the
hang of them. Metal ones,
wooden ones, big ones, small ones. All of them will find a use in your
shop if you give them even 1/2 a chance. You will never believe you
lived without.
Making them from scratch is a good
project. Blades are available but you can make those too.
Of course, the first thing
you have to do if you want to make a spokeshave is pee your pants! You
have to run in circles and throw up your hands and cry like a little girl.
Then crawl under your porch and hide there with a supply of canned water
for a long time. You next have to call in 22 licensed professionals and
pay them your life savings and cower in abject humility. Because we
all know some things are so difficult to accomplish, like gluing a piece
of paper or making a toy wheel ferinstance, that we must all cowtow in
the deep shadows of the great masters and never, ever encroach on their
hallowed turf. After all, protecting a sliver of knowledge is what life
is all about, right?
Or else a person could always...........
Stand up and turn around, never let them shoot us down........
Never, never, never.... Never Run Away. (Anne and Nancy
Wilson)
(rant over, hey I feel better now, thanks for listening)
You can do this. I could, so can
you.
So, shave day it was.
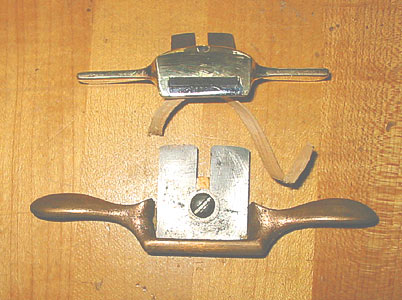
You know, anybody can get a spokeshave working in a couple hours if
they have a good blade to start with. These tools want to cut, there can
be no doubt. Give them a chance, any chance and wood will pour out of
the mouth with the least effort. They're so much fun. Plenty to be said
for a wooden spokeshave alright. Getting them to work is easy, the trick
is making them attractive. They have a very odd shape, very unlikely.
Kind of like a plane or saw tote. Your first guesses are likely to be
somewhat less than what you really had in mind. For such simple tools
the small things do add up.
But first, it happened I didn't have a good spokeshave blade to
start with. Drat!
Well I had some old used and abused blade stock laying around. No micro
controlled heat treat oven though. But gee whiz Mom, I have a woodstove!
I waited until near days end, placed the steel into the stove and
covered it with live coals. This would guarantee me heat and a cover of
ash when the coals died down. Being as it was pretty much just coals
left I opened the drafts to let in plenty of air blast and blow on
through. I made a spokeshave blade and some spares just for good
measure By morning, sure enough, the steel was annealed plenty soft
enough to cut, drill, tap, file and generally soft enough to work any
way I liked. .
Then I needed to harden it. Oh gorsh, I don't have a furnace. Woe is
me.... Hey waitaminute, how about a 1 burner propane camp stove you can
just plop the steel on to preheat whilst you do other things? Then light
2 propane torches and point them at each other making yourself a little
vortex of fire. I dunno, I didn't pay through the nose for those 2 yard
sale torches you know. But I suppose it's worth a try.......... Pick up
with a pliers and hold in the flame a minute and..... Weeeellll, lookie
here, bright cherry red! Pop the top off a pump oiler sitting there and
drop them in one by one as they cherried, quickly covering with a scrap
of wood to smother the fire. Stinks a bit, give it that.
A file won't cut them! Might be hard enough? Naaaa, not likely. Too bad
for me.
But now, I don't have a tempering oven. Ohhhh the humanity of it!
Tearing of hair and gnashing teeth.
Say, what's that I smell?? Could it be meatloaf? Could it be baking at
375 for an hour? Would some scraps of aluminum foil wrapped loosely
around the blades several times even up the temperature fluctuations a
little??
Probably not, but fool that I am, I'm going to try it anyway.
Hmmmmmmm, even sweet pale gold! Looks like they were plated with
something pretty. Not used to seeing temper colors so even. Not bad
meatloaf either.
[ (Soon as the meatloaf and blades came out, I dropped the temp down to
250 and baked some tools I'd recently painted, remember the shears last
week and especially the handles of same?. Nice tip Mr Thompson. Not
to be forgotten! That paint baked like glass in 25 minutes, about the
time dinner was done. ) ]
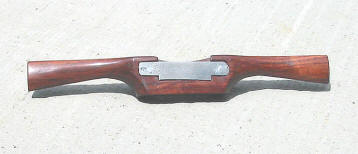
I had some blades. Next was cutting down some ordinary screws and
soldering them in. I used plenty of flux and held the screws over a
torch flame with a pair of heavy vise grips clamped on just behind the
cutting edge of the blade leaving the tang exposed to mop up excess heat
so none would creep into the blade and applied a drop of solder when the
time was right. When the solder "soaked in" I pulled from the flame and
snapped my wrist sharp to shake off any excess solder and then blew on
it a minute to set, then quenched in water. Did both sides this way o
course to attach both the screw tangs.
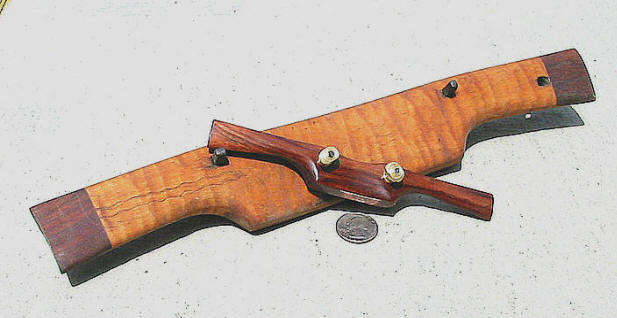
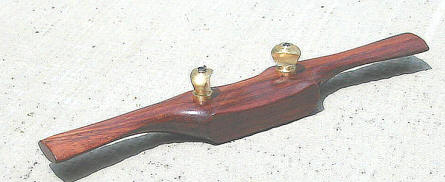
Some grinding and polishing later, finished blades!
Grabbed a piece of brass and made some nuts for it. I love the
traditional shape, must admit.
Time for a body.
Where are you Johnny Gunterman? Miss your voice.
http://web.archive.org/web/20011024172919/www.shavings.net/TEACHSHAVE.HTM
I got out every shave I had and took out the calipers. Measuring
proportions and trying to get the miriad shapes just right. Sure is an
unlikely stick! I looked over a lot of shaves deciding on which feature
or curve appealed to me most.
I laid out on a piece of rosewood and set to. I sawed, rasped and
filed. Then..........
Why oh why hasn't anyone ever invented something narrow and thin and
flexible in the way of a scraper to work these curves??
Oh wait a minute, they did. 8^D Little shavings peeled off that rosewood
like fiftys out of Donald Trump's wallet and fell gently to the floor so
quick and easy as each curve was worked to the lines. Lift the scraper
to a high angle and dig deep. Lay it down lower angle and tiny
smoothing shavings thin as a whisper curl away.
I sanded just a little after and polished bright of course.
I think I'm going to like it.
|
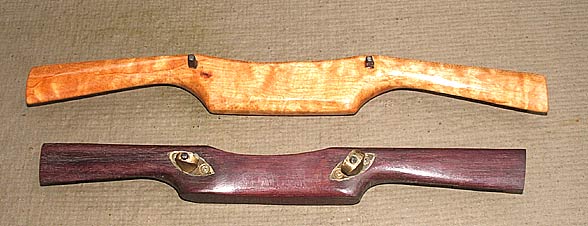
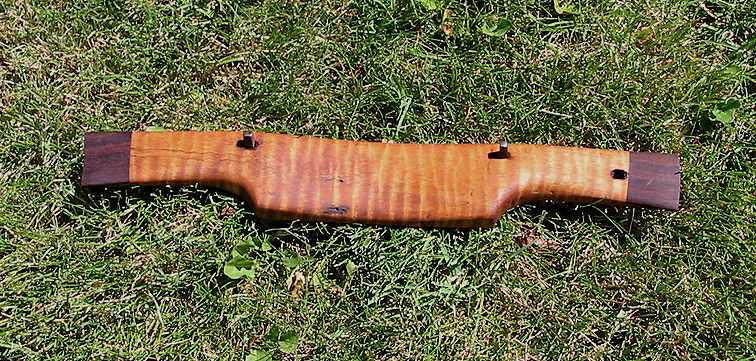
Traditional Stick Tang Shaves
Old Wooden shaves are
easy to restore too. You don't really need the screw adjust
posts, the tried and true taper fit tangs work just as well. I
got this drop dead huge curly maple coopers shave as a gift and it's become a favorite.
When I got it the ends of the frame had been docked short,
probably to allow working inside a barrel. Since I wasn't
planning on much cooperage in my future I lengthened the handles
with rosewood tips, open morticed on.
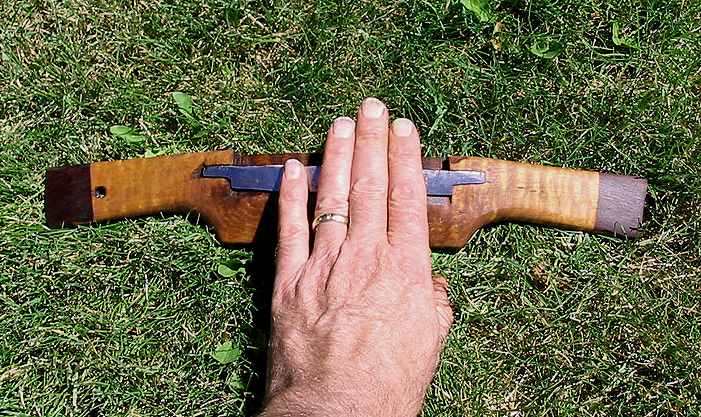
Now that's it's
set up and working this monster is the shave I hand new visitors
to my shop, man woman or child, all love peeling wood with it.
Naturally, as with most wooden shaves I keep one end of the
blade set ranker than the other so you have your instant choice
of quick hogging or fine work with the shift of the tool. I
can peel off shavings from behind my back, it's so easy. If I
could stand the teeth marks in the curly maple I'd play it with
my mouth. Jimi Hendrix eat your heart out!
|
|