|
This
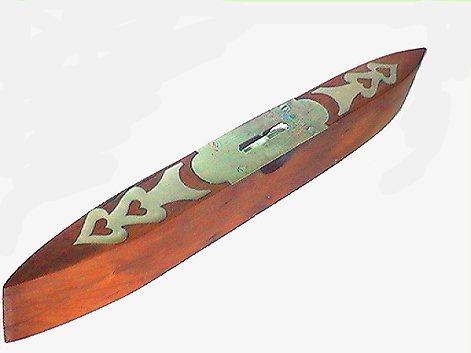
second one was a damaged Scottish level I got cheap and made new
brasses for.
Both
the end brasses and their inlays were missing with nothing to go
by except the cuts in the wood where they once lived. The
original brass stock was about .050. I had none. But I had some
.063 (1/16") so that's what I used.
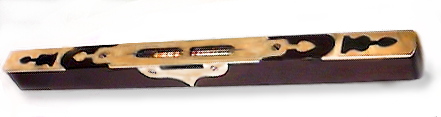
I
made a pattern out of sheet plastic for the inlay. I worked on
that until it looked pleasing enough. My first idea was to use
the pattern to stamp onto the brass, like a rubber stamp only
using 1/2 dry sticky acrylic paint for the ink. I glued some
more plastic to the pattern to beef it up and also make a handle
for this. I tried about 4 kinds of paint. Never did get a
perfect impression. I ended up just using a tiny dab of super
glue to hold the pattern in the right spot and carefully tracing
around it with a very small marker. You know, the art supply
size, super dinky.
Getting
the 2 pieces to appear identical, even for the outline was too
hard to do separately (I tried), so the next thing I did was
glue them together with a piece of polished paper in-between
(color catalog page and 5 min epox). Then I could file them both
together and get a lot closer to a real pair. The "U" shape
where they meet up with the wood was simply not going to happen
gracefully unless I used a large enough file to just let the
file shape the work. So that's what I did. A honkin big round
file cut this delicate part pretty perfectly round. Then a small
flat file rounded out the corners the opposite way. When
separated you couldn't tell one from the other. At first I
thought I could engrave away the "hole" for the inlay and tried
that. This is not recommended. 1/16" of brass is pretty deep to
cut. I drilled some holes, roughed out with jewelers saw and got
out the needle files. As I was filing, I made a conscious effort
to file the back side deeper. Kind of like an overall dovetail.
I figured this would lock in the inlay and I believe it has. It
also has the added bonus of being able to
press the inlay in further at the assembly for a tighter fit if
you do the inlay that way too, only the opposite of course.
I thought the brasses would be the hardest part and felt
relieved when they were finished. Ahhhhh, Wrong! The
wood is only something over 1/32 of an inch finished out. Even
rosewood gets pretty fragile in this size. Especially when you
consider there is no way to orient the grain for best strength.
You got little bits sticking out here and there everyplace.
I guess I won't tell how I prepared the stock for the inlay. But it did
involve jointing and filing a blade with a 2" outer diameter.
The brasses were used as the stencil for transferring the
pattern to the
wood. Once again I ended up with the glue and the tiny marker.
My paint kept seeping under and blurring the line so I gave up.
This time I would -just- file the line away instead of creeping
up to the edge of it. Pressing the little inlays in
was done with a vice and a piece of cork against the front side.
The inlays could be pressed in further to take up any slop this
way. I'd made the stock a little thicker that the finished
dimension. And there was some slop, bifocals or no! A flat
bastard cleaned up the back in the end followed by sandpaper on
a block.
I had intentionally left the brasses overlong. When it came time for
assembly all was scrubbed with acetone and steel wool, then
epoxy was smeared. I put a piece of metal against the overhang
and placed the whole affair in my face vice which thankfully
opened far enough. [I guess a bar clamp would have worked but I
already was wishing I had an extra hand or two.] Then I
could really reel on it to force a near perfect fit. It's an old
knife maker's trick.
A couple of clamps went on the topside to hold it down so it
couldn't squirm and then the screw was turned!! Next day, when
the glue had cured, it was regular coarse draw filing and then
finer files There were still a few micro voids. I mixed up
some fine dust and epoxy and packed them tight. After that was
cut back down it was finished on down to coarse scary sharp
techniques. Last was uh,,,, I'll just say, the "B" word.
Can you guess? Ok, we're grown ups here, it was
buffed with a cotton wheel with med aluminum oxide polishing
compound. I'd used rosewood for the inlays, but it wasn't the
perfectly black color the rest of the level was. I tried a
number of stains and dyes looking for the color, and guess what
worked? Blue magic marker was a
perfect match. Not my first guess. Go figure.
yours, Scott
|